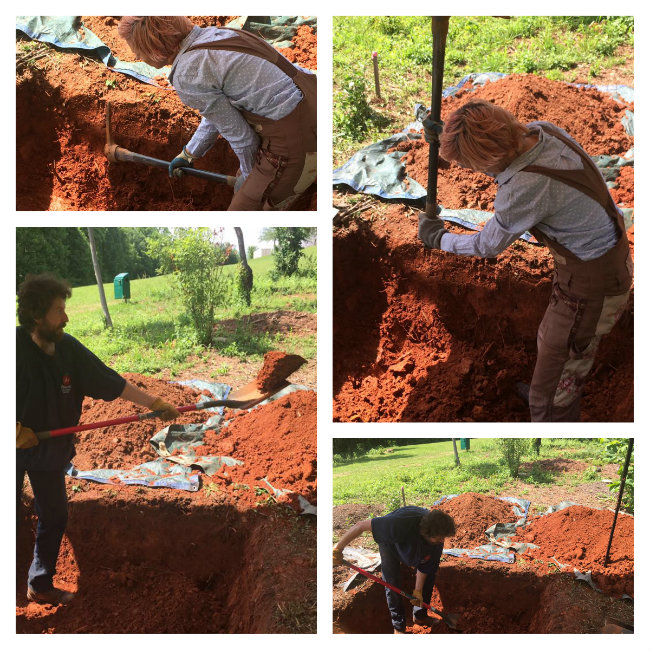
We’ve all seen it a dozen times in the movies… Someone digging a grave. Usually it’s done with one shovel and finished in an hour. Ha! Ha, I say! As if it were only that easy. When we dig graves at Carolina Memorial Sanctuary, everything is done by hand, and requires attention and care. It also requires a good bit of planning and the right tools. It is easier and less time consuming with at least two people working. Our goal is to reduce the impact on the Earth from both the digging itself and from the interment, and to allow for as much new life as possible to grow out of the space that has been disturbed. This is true for both burial of a body and burial of cremated remains. There are a few differences in how we dig these two types of graves.
Step 1: Plan
I think there is a general misunderstanding that we “just dig a hole”. Before my shovel even breaks ground, there are numerous considerations to be made at and around the site. It helps me to know how many people will be standing and/or sitting around the grave at the service so that I can clear and groom the area nearby. There are also 3 large piles of Earth that are coming out of the grave, which must be returned to the grave at the end of a service, and where and how they are arranged matters both spatially and logistically. If possible, I try to avoid causing significant damage to nearby mature plants and memorial plantings, so I may make slight adjustments to the edges of a grave, and even the angle of orientation. Depending on the weather conditions, I may also need a tent to put over my work space to protect from direct sun exposure or heavy precipitation.
Step 2: Gather the Tools
A good sharp spade is the primary digging tool, but there are many other useful tools for digging. A pick/mattock is indispensable for breaking up tough roots and clay and some rock or stone deposits. A rock bar (also sometimes called a spud bar) is useful when large, heavy stones or significant rock shelves are encountered. I rarely use post-hole diggers for actual earth removal, but I do have a pair with markings along the handles which I use as a depth gauge. Even if you don’t own a post-hole digger with measurement markers, you can make your own with a yardstick and a permanent marker. I also bring along a garden rake, an edging tool (basically a flat “blade” with a six to eight inch cutting surface at the end of a long handle), and a grave template which gives me a set of dimensions from which to dig the grave. For clearing the area around a grave, I also bring at least 3 large tarps (6 if I am expecting rain), a lawn mower, weed eater, chainsaw, loppers, and pruning shears. The chainsaw is mostly in case I encounter extremely large tough roots, so I don’t use brand new blades (cutting into even a small bit of soil can be dangerous, and will quickly dull chainsaw blades, and can gum up the inside around the chain blade housing).

Step 3: Prepare the Site
With tools gathered, and hopefully a ready and willing digging team, I am now ready to begin the work of clearing the space around the grave. I weed eat and mow a general area around the stake which marks the burial spot, then I lay out my template, which is about 90 inches long by 36 inches wide, and look to see if more space is needed and if any difficulties or hazards need to be addressed or removed. I try to remove all thorny and viny plants from the area, limb up low hanging branches from nearby trees, move rocks and fallen limbs out of the area, and allow extra space on steep slopes or other uneven ground to accommodate more people standing or sitting within eyesight and earshot of the grave.
With my template still in place, I lay out 3 tarps near the gravesite, with the largest of these uphill from the grave. This is because the largest soil layer is also the heaviest and the first to return to the grave at closing, and it is easier to shovel or scoop downhill than up. The other two tarps I try to arrange on the same side so there is room to move beside the grave without too much risk of falling in. I then take the edging tool and cut the outline of the grave into the earth. When I have a rectangle cut in, I remove the template and set it aside.
Step 4: Dig the First Layer
When digging a grave, as the earth comes out, it goes into three different piles. We keep the soil layers mostly separate (as much as possible) so that the micro ecosystems in each layer can have less stress when they are reestablishing after the closing of a grave. Water absorption capacity, air, light, and the presence of particular types of bacteria, fungi, and other organisms are all different from layer to layer and can play a very important role in how new plant growth at the site is able to take root.
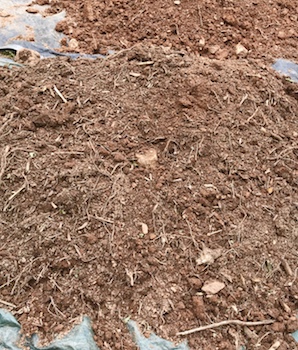
On the smallest tarp, I place the excavated earth from the organic matter and topsoil layer. This layer is anywhere from 3-7 inches deep, depending on conditions at the site. It is characterized by the shallow roots of grasses and herbaceous plants on the surface, and is usually a dark color and loose, granular texture. There can be a fair amount of variation here from site to site, but I can usually tell while I am digging when the soil changes color and composition, which indicates to me that it is time to switch to another tarp for the next layer. I am also familiar with the root systems of many of the more invasive plants growing on our property. I do my best to remove the majority of these undesirable roots from the grave soil so that they will not then re-establish dominance over the native plants. After excavating all or at least most of this layer, I take the edging tool and reset the template so that I can square my sides and check that I am still digging the desired dimensions of the grave.
Step 5: Dig the Second Layer
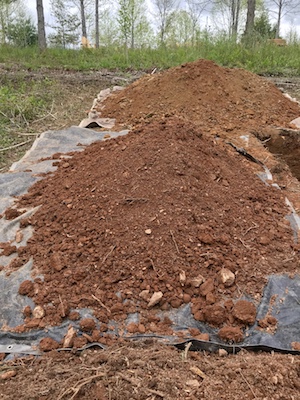
The next layer down is called the eluviated or leaching layer, and at least at the Sanctuary, it tends to be a lighter color than the topsoil, and with fewer hairy or stringy roots. It is still fairly loose, and many thicker roots can still be found going into or through this layer. I also often find earthworms and sometimes beetles or other invertebrate life in this layer. On our property, this layer usually goes down another eight to twelve inches. Again, I use the edging tool periodically in this layer to square my edges. There is also a tendency while digging down to work somewhat inward subconsciously, which if not checked, could result in the bottom of the grave being much smaller than the opening, and that won’t work well if there is a coffin or casket in use. Even though I may need to start getting into the hole itself while I excavate this layer, I still do the edging work from the surface, so that I don’t lose my perspective. The edger also adds a level of attention to detail, which not everyone will notice, but those who have mentioned their notice of it to me have been appreciative of that level of care and attention, something to the effect of knowing that I didn’t rush through digging just another hole.
Step 6: Dig the Third/Final Layer
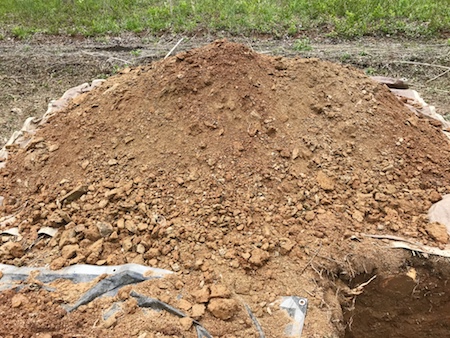
The final layer with which we are concerned at Carolina Memorial Sanctuary is the subsoil, which on our property is made up of mostly clay and mineral deposits. It is where I usually encounter the most stones or rock shelves, and it is usually very dense and heavy. Even without rock obstructions, I still often use the mattock to break up and loosen the soil in this layer for easier excavation. If there is a need to chip or pick at stones (even smaller ones), it is important that everyone on the site wears safety eye gear so that flying rock splinters don’t result in serious injury. If I encounter particularly large or difficult rock deposits, I will first try to get beside and up underneath them with the mattock or the rock bar to see if they can be dislodged before I spend a lot of energy trying to break them up. Because we are in the mountains, or at least at their edge, it is not entirely uncommon to encounter a significant shelf of rock that will need to be broken up. This is where having helpers is extremely beneficial as a even with a pick and rock bar, the work can very quickly wear one person out. After significant amounts of earth are excavated from this layer, I again take the edging tool – still from ground height – and square up the edges as best I can. This is also the layer where the depth gauge (post-hole diggers with markings) comes into play.
Depth – Will an animal dig up the body?
We excavate to about 3 feet for body burial, although with taller burial containers, I do sometimes go an extra two or three inches to accommodate the size of the container. The actual depth of the grave itself is not the issue, but rather a North Carolina legal requirement that says we have to put a minimum of eighteen inches of soil over a body. This eighteen inch rule creates what is known as the “smell barrier.” Most animals cannot smell even the strong scent of decomposition through a barrier of twelve inches of soil, including humans! Even the most sensitive of smellers cannot detect any scent through eighteen inches of soil, so our three foot deep grave well surpasses the requirement.
Last Step: Prepare the Site for the Burial & Service
Once the final layer of earth is excavated, I once again square the corners of the bottom of the grave, and use the mattock and the rake to smooth and level the bottom as much as possible. Before I finish my work, I usually take a nice few minutes break in the coolness of the bottom of the grave to catch my breath, drink some water, and view the completed grave itself. But wait, after I dig there’s more? Well, yes, of course there is more! (I have had this conversation with myself after digging my first few graves, nearly word for word.) To prevent water from pooling in the bottom of the grave, I place boards across the open grave itself, and then I cover the whole thing with a tarp, which I secure around the edges of the grave with stones. Similarly, to prevent erosion or other undesirable effect to the piles of excavated soil, I cover them with tarps secured with rocks as well. Finally, I remove all of my tools and equipment from the site, even if some of them might be used at the service for closing, so that they don’t suffer ill-effects from weather.
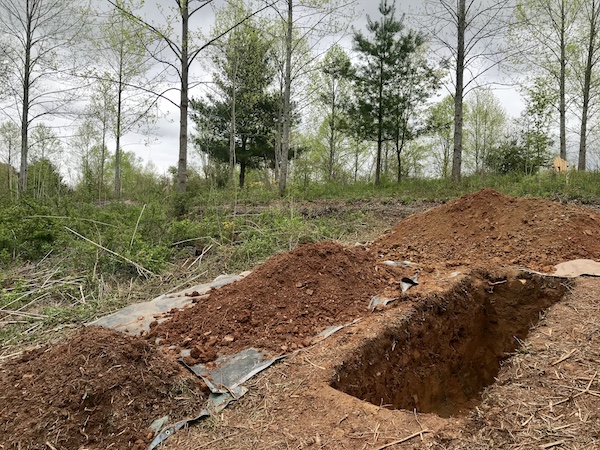
The movies don’t get it right. You need more than a shovel and you need more than an hour. It is an incredibly daunting task. When I first started digging for the Sanctuary, it took me about eight to ten hours to dig a human size grave. Now, with a fair amount of experience and almost always a helper, we can dig a grave in about four to five hours. In addition to the time and tools required, the movies also fail to capture something even more significant, which is how rewarding the work is. To use your body in such a physical way, although hard, feels good. When you step out of a finished grave, there’s an immediate sense of accomplishment. And when you think of the family who will help to lower their loved one in the grave, there’s a sense of reverence for the cycle of life and for those who are embarking on a life changing journey as they place their loved one to rest.
Resource: The Science Behind Behind Green Conventional Burial (Green Burial Council, 2016)
Learn more about Conservation & Green Burial
Contact Us to Schedule a Tour
